Step
Open Business Central search
Use Alt+Q to open Tell Me and search for Extension Marketplace.
Tacto connect helps Business Central teams deliver purchasing data to Tacto quickly and reliably. Configure export scope and field structure in Business Central, then deliver files by ZIP download, Azure Blob Storage, or local storage in on-premises deployments.
Install the extension directly from Microsoft AppSource within Dynamics 365 Business Central.
Use Alt+Q to open Tell Me and search for Extension Marketplace.
Search for the app, open the marketplace entry and choose Get it now.
Follow the standard Dynamics 365 Business Central prompts.
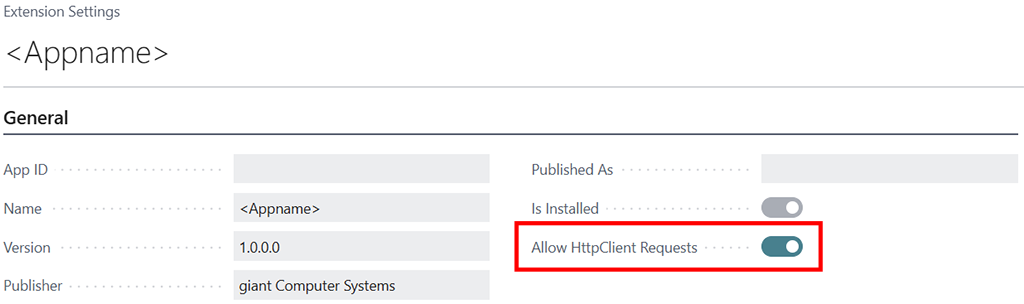
Important: Allow HttpClient Requests
Because this app requires internet access to communicate with external web services, you must allow it to make HTTP requests. Open the Extension Management page, search for Tacto connect, and open the extension settings. Make sure the Allow HttpClient Requests toggle is enabled.
After installation, Tacto connect creates the setup record automatically and inserts a ready-to-use default export configuration.
Press Alt+Q to open Tell Me and search for Tacto Setup. This is the central page for export settings, Azure parameters, and export actions.
The installation routine inserts a starter configuration for 23 tables, including items, vendors, contacts, purchase documents, posted receipts, posted invoices, credit memos, price list lines, payment terms, locations, shipment methods, and item variants.
Azure defaults are also prefilled when the setup record is created:
Tacto connect clearly separates administration from operational export execution.
| Permission set | Recommended use | Capabilities |
|---|---|---|
| Tacto connect Admin | BC administrators and owners of the Tacto setup | Configures export tables, fields, filters, and all other setup parameters, and maintains the complete export configuration. |
| Tacto connect User | Purchasing users who manually trigger exports | Can manually start the prepared export without changing export tables or field definitions. |
Practical assignment model
Assign Admin only to users who set up export tables and fields. User is intended for purchasing users who manually start exports based on that configuration.
The Tacto Setup page adapts to the selected export method and your deployment model.
| Field | What it does |
|---|---|
| Date Filter | Limits item and posted ledger-related data using a CALCDATE formula such as <-12M>, <-2Y>, or <-180D>. Leave it empty to disable date-based filtering. |
| Only Export Referenced Items | Restricts the export to records with purchasing relevance. To do this, each relevant table needs a field marked as the item filter so Tacto connect can identify the item reference used to scope those records. |
| Export Method | Controls whether the export is delivered as ZIP Download, Azure Blob Storage, or Local Storage. In SaaS, only ZIP Download and Azure Blob Storage are available. |
| Export Path | Required only for Local Storage. Defines the full server path where the CSV files are saved in on-premises environments. |
| Azure App ID / Client Secret / Tenant ID | OAuth2 client-credential parameters used to obtain an access token for Azure Storage. |
| Azure Account Name / Container / Blob Folder | Defines the exact Azure Storage target for uploaded CSV files. |
Run the first export without a date filter
For the initial export, leave the date filter empty so Tacto receives a complete data set. For all subsequent regular exports you can set a date filter – for example -30D for the last 30 days – to limit the transfer to records that have actually changed.
Azure mode requires outbound HTTP access
If you use Azure Blob Storage, make sure the extension is allowed to perform HttpClient requests in Business Central. Without that permission, token acquisition and uploads cannot succeed.
Each method uses the same CSV logic and only differs in delivery channel.
Best for manual exports in SaaS. Generated CSV files are staged internally and delivered as one ZIP archive.
Best for automated handoff to Tacto. Tacto connect authenticates via OAuth2 client credentials and uploads each CSV to the configured storage target.
Available in on-premises environments only. Each generated CSV is saved directly to the configured server path.
The metadata-driven export model lets administrators adapt structure and filters without AL changes.
Open Export Table Config from the setup page to manage the list of exported tables. Each entry stores:
System records are tracked with ownership metadata (System Managed, System Version, User Modified) to support safe upgrades and controlled reset behavior.
.tct snapshot file for backup/transfer..tct file.Use Edit Fields on a table entry to open the field list. The page lets you add fields from the selected table and configure behavior per field:
>0, Purchase, 2).If a field has both Setup Date Filter and Static Field Filter, both filters are combined with logical AND during export.
The export itself is started from the TACTO Export action on the setup page.
Check the date filter, temporary-table option, and selected export method. If you use Local Storage, verify the export path. If you use Azure, verify all Azure credentials and target fields.
The extension reads the configured table list, builds the CSV header from the selected fields, applies table-specific filters, and exports only the records that pass the configured scope logic.
Depending on the export method, the files are downloaded as a ZIP, uploaded to Azure Blob Storage, or saved to the local server path.
| Area | Filter logic |
|---|---|
| Items | If a date filter is set, records are filtered on Last Date Modified to export only newer changes. |
| Purchase receipts, invoices, and credit memos | Posted document tables are filtered by Posting Date when a date filter is active. |
| Purchase lines | Only lines with a non-empty type are exported. |
| Price List Line | Only purchase prices with source type Vendor are exported. |
| Referenced-item mode | When Only Export Referenced Items is active, records are scoped by configured item-reference fields and purchasing activity context. |
| Static field filters | Configured static field filters are applied even for fields that are not exported (filter-only fields). |
Whether you have technical questions, need guidance during your rollout, or want to share feature requests, our dedicated Dynamics 365 Business Central team is ready to assist you. Drop us a message, and we will ensure you get the absolute most out of our apps.